you can get 3 cards out of one sheet of 8 1/2 x 11 CS.- This is the inside of the finished card on the right. If you open and close the card really fast, he looks like he is clapping!
I have made this card with many different sizes but the basics of the mechanism is the same.
The base of this card is 11x smidgen more than 2 8/10 inches (1/3 of the 8 1/2) folded at 5 1/2 inch on the 11 inch side. (Long ways)
The pieces for decoration are as shown on the left. You need 1 piece 3/4" x smidgen more than 2 8/10 inches or so(width of card) 2 black buttons (this was a button punch but you could just use a 3/4 inch circle punch. I took a 1 1/2 inch strip of tangerine CS and cut them by hand into long triangles to make a bunch of noses. The big white curved white piece was for guideline for drawing the head of the snowman in the corner under the hat with a black marker. The hat was made using black and red glimmer paper. The base was 3/10 inch strips, the banc was 1/2 inch strips and the main hat was 1 1/2 inch tall. I cut the piece twice as wide and cut it in diagonal to get 2 pieces. Make sure you cut the diagonal on the proper side, otherwise it will not fit (the glimmer paper is not double sided to be able to flip it). The holly on the hat was a pack of pre-made stickers from Michael's.
You fold the mechanism like this and put sticky tape on the triangular part on top and bottom and this gets put into the fold of the card as shown. I eyeball it but lot of people like to measure it which is fine.
When you open it it should look like this.
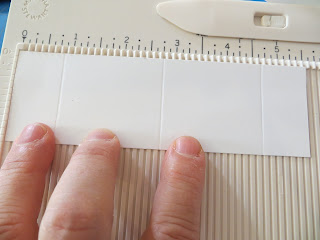
Take the other strip 5 1/2 x 1 3/4 and score at 7/8, 2 3/4 and 4 5/8 inches as shown.
put the center of the piece on top of the center of the mechanism piece.
You need to put tape or glue onto the opposite corners- either left bottom and right top or left top and right bottom. It will twist differently depending on how the glue/tape if put but it does not matter.
Then open the the piece to adhere the 2 corners as shown.

I added red gloves (hand cut from 2x2 piece of red carstock to fit) and glued it as shown to the 2 outer rectangle corners.
Pop the center out and you have the twist and pop card.
I attached money by putting on a little bit of tombow tape onto the wrist area of the gloves while it was flat and the money folds into the popup. It was a fun way of giving money for Christmas.
This is how you mount the gift card- use 2 pieces of tape - scotch or packing works fine and fold them in half, place the first tape with the fold on the left of the center mountain fold and the second tape on the right of the mountain fold as shown on the right.
When you put the card on the tape it floats like this and looks like the snowman is holding it out.
When you adhere the money- nice crisp ones would be nice- it folds up like this
It twists and fold flat inside the card so it does not show.
I made little pockets that holds the cards- they are a little too fat to mail-
I took some DSP 6 1/2 x 5 1/2 - you can get 4 sheets out of a 12x12 paper if you cut it carefully - score it at 3 inches and at 6 inches along the 6 1/2 side and 1/2 inch along the 5 1/2 side.-cut out the corner and one of the 1/2 inch tabs as shown on the right and then punch the top with the envelope punch to make a little groove to complete the package.
Enjoy!


1 comment:
This is absolutely adorable!!!! Sadly, I didn't see this the day you posted it or I would have made these for my money gifts! But, I'll have them ready for next year! Good Job!
Post a Comment